In 2018 we saw the rise of pretraining and finetuning in natural language processing. Large neural networks have been trained on general tasks like language modeling and then fine-tuned for classification tasks. One of the latest milestones in this development is the release of BERT. BERT is a model that broke several records for how well models can handle language-based tasks. If you want more details about the model and the pre-training, you find some resources at the end of this post.
This is a new post in my NER series. I will show you how you can finetune the Bert model to do state-of-the art named entity recognition. First you install the amazing transformers package by huggingface with
pip install transformers=2.6.0
Now you have access to many transformer-based models including the pre-trained Bert models in pytorch.
Load the data
We use the data set, you already know from my previous posts about named entity recognition. If you want to run the tutorial yourself, you can find the dataset here.
import pandas as pd
import numpy as np
from tqdm import tqdm, trange

data = pd.read_csv("ner_dataset.csv", encoding="latin1").fillna(method="ffill")
data.tail(10)
| Sentence # | Word | POS | Tag | |
|---|---|---|---|---|
| 1048565 | Sentence: 47958 | impact | NN | O |
| 1048566 | Sentence: 47958 | . | . | O |
| 1048567 | Sentence: 47959 | Indian | JJ | B-gpe |
| 1048568 | Sentence: 47959 | forces | NNS | O |
| 1048569 | Sentence: 47959 | said | VBD | O |
| 1048570 | Sentence: 47959 | they | PRP | O |
| 1048571 | Sentence: 47959 | responded | VBD | O |
| 1048572 | Sentence: 47959 | to | TO | O |
| 1048573 | Sentence: 47959 | the | DT | O |
| 1048574 | Sentence: 47959 | attack | NN | O |
class SentenceGetter(object):

    def __init__(self, data):
        self.n_sent = 1
        self.data = data
        self.empty = False
        agg_func = lambda s: [(w, p, t) for w, p, t in zip(s["Word"].values.tolist(),
                                                           s["POS"].values.tolist(),
                                                           s["Tag"].values.tolist())]
        self.grouped = self.data.groupby("Sentence #").apply(agg_func)
        self.sentences = [s for s in self.grouped]

    def get_next(self):
        try:
            s = self.grouped["Sentence: {}".format(self.n_sent)]
            self.n_sent += 1
            return s
        except:
            return None
getter = SentenceGetter(data)
This is how the sentences in the dataset look like.
sentences = [[word[0] for word in sentence] for sentence in getter.sentences]
sentences[0]
['Thousands',
 'of',
 'demonstrators',
 'have',
 'marched',
 'through',
 'London',
 'to',
 'protest',
 'the',
 'war',
 'in',
 'Iraq',
 'and',
 'demand',
 'the',
 'withdrawal',
 'of',
 'British',
 'troops',
 'from',
 'that',
 'country',
 '.']
The sentences are annotated with the BIO-schema and the labels look like this.
labels = [[s[2] for s in sentence] for sentence in getter.sentences]
print(labels[0])
['O', 'O', 'O', 'O', 'O', 'O', 'B-geo', 'O', 'O', 'O', 'O', 'O', 'B-geo', 'O', 'O', 'O', 'O', 'O', 'B-gpe', 'O', 'O', 'O', 'O', 'O']
tag_values = list(set(data["Tag"].values))
tag_values.append("PAD")
tag2idx = {t: i for i, t in enumerate(tag_values)}
Apply Bert
Prepare the sentences and labels
Before we can start fine-tuning the model, we have to prepare the data set for the use with pytorch and BERT.
import torch
from torch.utils.data import TensorDataset, DataLoader, RandomSampler, SequentialSampler
from transformers import BertTokenizer, BertConfig

from keras.preprocessing.sequence import pad_sequences
from sklearn.model_selection import train_test_split

torch.__version__
Using TensorFlow backend.


'1.2.0'
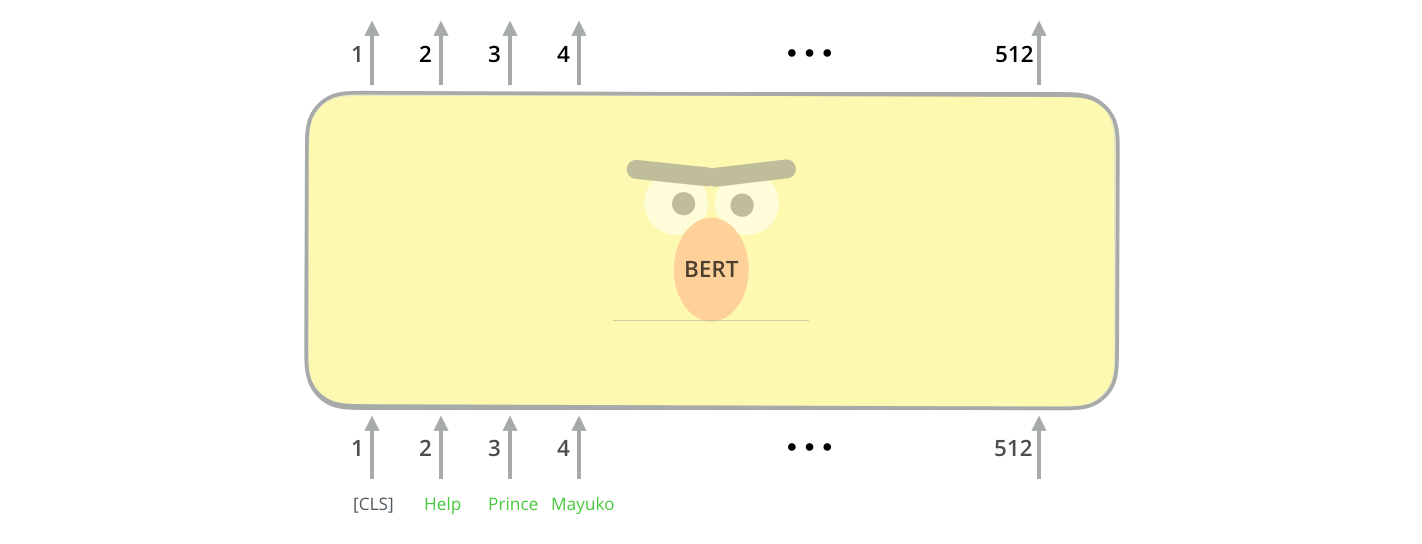
Here we fix some configurations. We will limit our sequence length to 75 tokens and we will use a batch size of 32 as suggested by the Bert paper. Note, that Bert supports sequences of up to 512 tokens.
MAX_LEN = 75
bs = 32
device = torch.device("cuda" if torch.cuda.is_available() else "cpu")
n_gpu = torch.cuda.device_count()
torch.cuda.get_device_name(0)
'GeForce GTX 1080 Ti'
The Bert implementation comes with a pretrained tokenizer and a definied vocabulary. We load the one related to the smallest pre-trained model bert-base-cased. We use the cased variate since it is well suited for NER.
tokenizer = BertTokenizer.from_pretrained('bert-base-cased', do_lower_case=False)
Now we tokenize all sentences. Since the BERT tokenizer is based a Wordpiece tokenizer it will split tokens in subword tokens. For example ‘gunships’ will be split in the two tokens ‘guns’ and ‘##hips’. We have to deal with the issue of splitting our token-level labels to related subtokens. In practice you would solve this by a specialized data structure based on label spans, but for simplicity I do it explicitly here.
def tokenize_and_preserve_labels(sentence, text_labels):
    tokenized_sentence = []
    labels = []

    for word, label in zip(sentence, text_labels):

        # Tokenize the word and count # of subwords the word is broken into
        tokenized_word = tokenizer.tokenize(word)
        n_subwords = len(tokenized_word)

        # Add the tokenized word to the final tokenized word list
        tokenized_sentence.extend(tokenized_word)

        # Add the same label to the new list of labels `n_subwords` times
        labels.extend([label] * n_subwords)

    return tokenized_sentence, labels
tokenized_texts_and_labels = [
    tokenize_and_preserve_labels(sent, labs)
    for sent, labs in zip(sentences, labels)
]
tokenized_texts = [token_label_pair[0] for token_label_pair in tokenized_texts_and_labels]
labels = [token_label_pair[1] for token_label_pair in tokenized_texts_and_labels]
Next, we cut and pad the token and label sequences to our desired length.
input_ids = pad_sequences([tokenizer.convert_tokens_to_ids(txt) for txt in tokenized_texts],
                          maxlen=MAX_LEN, dtype="long", value=0.0,
                          truncating="post", padding="post")
tags = pad_sequences([[tag2idx.get(l) for l in lab] for lab in labels],
                     maxlen=MAX_LEN, value=tag2idx["PAD"], padding="post",
                     dtype="long", truncating="post")
The Bert model supports something called attention_mask, which is similar to the masking in keras. So here we create the mask to ignore the padded elements in the sequences.
attention_masks = [[float(i != 0.0) for i in ii] for ii in input_ids]
Now we split the dataset to use 10% to validate the model.
tr_inputs, val_inputs, tr_tags, val_tags = train_test_split(input_ids, tags,
                                                            random_state=2018, test_size=0.1)
tr_masks, val_masks, _, _ = train_test_split(attention_masks, input_ids,
                                             random_state=2018, test_size=0.1)
Since we’re operating in pytorch, we have to convert the dataset to torch tensors.
tr_inputs = torch.tensor(tr_inputs)
val_inputs = torch.tensor(val_inputs)
tr_tags = torch.tensor(tr_tags)
val_tags = torch.tensor(val_tags)
tr_masks = torch.tensor(tr_masks)
val_masks = torch.tensor(val_masks)
The last step is to define the dataloaders. We shuffle the data at training time with the RandomSampler and at test time we just pass them sequentially with the SequentialSampler.
train_data = TensorDataset(tr_inputs, tr_masks, tr_tags)
train_sampler = RandomSampler(train_data)
train_dataloader = DataLoader(train_data, sampler=train_sampler, batch_size=bs)

valid_data = TensorDataset(val_inputs, val_masks, val_tags)
valid_sampler = SequentialSampler(valid_data)
valid_dataloader = DataLoader(valid_data, sampler=valid_sampler, batch_size=bs)
Setup the Bert model for finetuning
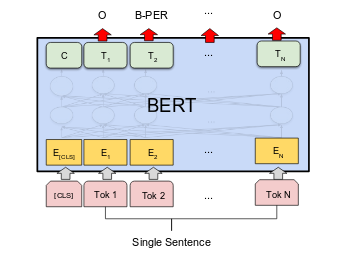
The transformer package provides a BertForTokenClassification class for token-level predictions.
BertForTokenClassification is a fine-tuning model that wraps BertModel and adds token-level classifier on top of the BertModel. The token-level classifier is a linear layer that takes as input the last hidden state of the sequence. We load the pre-trained bert-base-cased model and provide the number of possible labels.
import transformers
from transformers import BertForTokenClassification, AdamW

transformers.__version__
'2.6.0'
model = BertForTokenClassification.from_pretrained(
    "bert-base-cased",
    num_labels=len(tag2idx),
    output_attentions = False,
    output_hidden_states = False
)
Now we have to pass the model parameters to the GPU.
model.cuda();
Before we can start the fine-tuning process, we have to setup the optimizer and add the parameters it should update. A common choice is the AdamW optimizer. We also add some weight_decay as regularization to the main weight matrices. If you have limited resources, you can also try to just train the linear classifier on top of BERT and keep all other weights fixed. This will still give you a good performance.
FULL_FINETUNING = True
if FULL_FINETUNING:
    param_optimizer = list(model.named_parameters())
    no_decay = ['bias', 'gamma', 'beta']
    optimizer_grouped_parameters = [
        {'params': [p for n, p in param_optimizer if not any(nd in n for nd in no_decay)],
         'weight_decay_rate': 0.01},
        {'params': [p for n, p in param_optimizer if any(nd in n for nd in no_decay)],
         'weight_decay_rate': 0.0}
    ]
else:
    param_optimizer = list(model.classifier.named_parameters())
    optimizer_grouped_parameters = [{"params": [p for n, p in param_optimizer]}]

optimizer = AdamW(
    optimizer_grouped_parameters,
    lr=3e-5,
    eps=1e-8
)
We also add a scheduler to linearly reduce the learning rate throughout the epochs.
from transformers import get_linear_schedule_with_warmup

epochs = 3
max_grad_norm = 1.0

# Total number of training steps is number of batches * number of epochs.
total_steps = len(train_dataloader) * epochs

# Create the learning rate scheduler.
scheduler = get_linear_schedule_with_warmup(
    optimizer,
    num_warmup_steps=0,
    num_training_steps=total_steps
)
Fit BERT for named entity recognition
First we define some metrics, we want to track while training. We use the f1_score from the seqeval package. You ca find more details here. And we use simple accuracy on a token level comparable to the accuracy in keras.
from seqeval.metrics import f1_score, accuracy_score
Finally, we can finetune the model. A few epochs should be enougth. The paper suggest 3-4 epochs.
## Store the average loss after each epoch so we can plot them.
loss_values, validation_loss_values = [], []

for _ in trange(epochs, desc="Epoch"):
    # ========================================
    #               Training
    # ========================================
    # Perform one full pass over the training set.

    # Put the model into training mode.
    model.train()
    # Reset the total loss for this epoch.
    total_loss = 0

    # Training loop
    for step, batch in enumerate(train_dataloader):
        # add batch to gpu
        batch = tuple(t.to(device) for t in batch)
        b_input_ids, b_input_mask, b_labels = batch
        # Always clear any previously calculated gradients before performing a backward pass.
        model.zero_grad()
        # forward pass
        # This will return the loss (rather than the model output)
        # because we have provided the `labels`.
        outputs = model(b_input_ids, token_type_ids=None,
                        attention_mask=b_input_mask, labels=b_labels)
        # get the loss
        loss = outputs[0]
        # Perform a backward pass to calculate the gradients.
        loss.backward()
        # track train loss
        total_loss += loss.item()
        # Clip the norm of the gradient
        # This is to help prevent the "exploding gradients" problem.
        torch.nn.utils.clip_grad_norm_(parameters=model.parameters(), max_norm=max_grad_norm)
        # update parameters
        optimizer.step()
        # Update the learning rate.
        scheduler.step()

    # Calculate the average loss over the training data.
    avg_train_loss = total_loss / len(train_dataloader)
    print("Average train loss: {}".format(avg_train_loss))

    # Store the loss value for plotting the learning curve.
    loss_values.append(avg_train_loss)


    # ========================================
    #               Validation
    # ========================================
    # After the completion of each training epoch, measure our performance on
    # our validation set.

    # Put the model into evaluation mode
    model.eval()
    # Reset the validation loss for this epoch.
    eval_loss, eval_accuracy = 0, 0
    nb_eval_steps, nb_eval_examples = 0, 0
    predictions , true_labels = [], []
    for batch in valid_dataloader:
        batch = tuple(t.to(device) for t in batch)
        b_input_ids, b_input_mask, b_labels = batch

        # Telling the model not to compute or store gradients,
        # saving memory and speeding up validation
        with torch.no_grad():
            # Forward pass, calculate logit predictions.
            # This will return the logits rather than the loss because we have not provided labels.
            outputs = model(b_input_ids, token_type_ids=None,
                            attention_mask=b_input_mask, labels=b_labels)
        # Move logits and labels to CPU
        logits = outputs[1].detach().cpu().numpy()
        label_ids = b_labels.to('cpu').numpy()

        # Calculate the accuracy for this batch of test sentences.
        eval_loss += outputs[0].mean().item()
        predictions.extend([list(p) for p in np.argmax(logits, axis=2)])
        true_labels.extend(label_ids)

    eval_loss = eval_loss / len(valid_dataloader)
    validation_loss_values.append(eval_loss)
    print("Validation loss: {}".format(eval_loss))
    pred_tags = [tag_values[p_i] for p, l in zip(predictions, true_labels)
                                 for p_i, l_i in zip(p, l) if tag_values[l_i] != "PAD"]
    valid_tags = [tag_values[l_i] for l in true_labels
                                  for l_i in l if tag_values[l_i] != "PAD"]
    print("Validation Accuracy: {}".format(accuracy_score(pred_tags, valid_tags)))
    print("Validation F1-Score: {}".format(f1_score(pred_tags, valid_tags)))
    print()
Epoch:   0%|          | 0/3 [00:00<?, ?it/s]

Average train loss: 0.1898609203341009
Validation loss: 0.13870085475345453
Validation Accuracy: 0.9573218932182734


Epoch:  33%|███▎      | 1/3 [05:46<11:32, 346.48s/it]

Validation F1-Score: 0.8082904653666707

Average train loss: 0.10873485815810044
Validation loss: 0.12388065780202548
Validation Accuracy: 0.9618919007937815


Epoch:  67%|██████▋   | 2/3 [11:33<05:46, 346.66s/it]

Validation F1-Score: 0.8290478043523812

Average train loss: 0.08079738907924708
Validation loss: 0.13116426080465315
Validation Accuracy: 0.9616613418530351


Epoch: 100%|██████████| 3/3 [17:20<00:00, 346.92s/it]

Validation F1-Score: 0.8295603479089718
Note, that already after the first epoch we get a better performance than in all my previous posts on the topic.
Visualize the training loss
import matplotlib.pyplot as plt
%matplotlib inline

import seaborn as sns

# Use plot styling from seaborn.
sns.set(style='darkgrid')

# Increase the plot size and font size.
sns.set(font_scale=1.5)
plt.rcParams["figure.figsize"] = (12,6)

# Plot the learning curve.
plt.plot(loss_values, 'b-o', label="training loss")
plt.plot(validation_loss_values, 'r-o', label="validation loss")

# Label the plot.
plt.title("Learning curve")
plt.xlabel("Epoch")
plt.ylabel("Loss")
plt.legend()

plt.show()
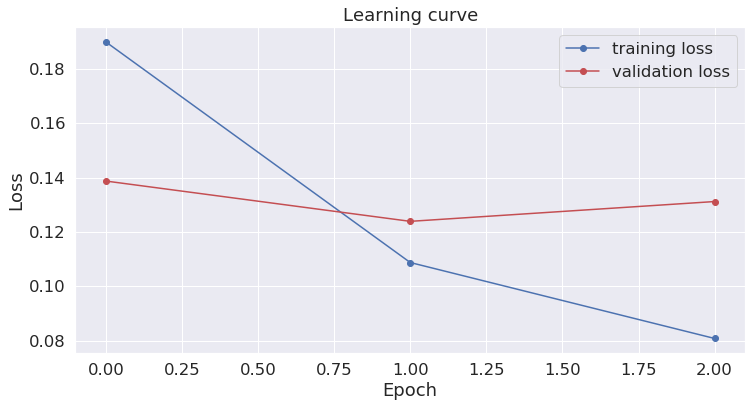
This looks good so we move on.
Apply the model to a new sentence
Finally we want our model to identify named entities in new text. I just took this sentence from the recent New York Times frontpage.
test_sentence = """
Mr. Trump’s tweets began just moments after a Fox News report by Mike Tobin, a
reporter for the network, about protests in Minnesota and elsewhere.
"""
We first tokenize the text.
tokenized_sentence = tokenizer.encode(test_sentence)
input_ids = torch.tensor([tokenized_sentence]).cuda()
Then we can run the sentence through the model.
with torch.no_grad():
    output = model(input_ids)
label_indices = np.argmax(output[0].to('cpu').numpy(), axis=2)
# join bpe split tokens
tokens = tokenizer.convert_ids_to_tokens(input_ids.to('cpu').numpy()[0])
new_tokens, new_labels = [], []
for token, label_idx in zip(tokens, label_indices[0]):
    if token.startswith("##"):
        new_tokens[-1] = new_tokens[-1] + token[2:]
    else:
        new_labels.append(tag_values[label_idx])
        new_tokens.append(token)
for token, label in zip(new_tokens, new_labels):
    print("{}\t{}".format(label, token))
O	[CLS]
B-per	Mr
B-per	.
I-per	Trump
O	’
O	s
O	tweets
O	began
O	just
O	moments
O	after
O	a
B-org	Fox
I-org	News
O	report
O	by
B-per	Mike
I-per	Tobin
O	,
O	a
O	reporter
O	for
O	the
O	network
O	,
O	about
O	protests
O	in
B-geo	Minnesota
O	and
O	elsewhere
O	.
O	[SEP]
As you can see, this works amazing! This approach will give you very strong performing models for named entity recognition. Since BERT is available as a multilingual model in 102 languages, you can use it for a wide variety of tasks. Try it for your problems and let me know how it works for you.
Resources
- Beautifully illustrated explanation of Bert, ELMo and ULM-Fit
- The original Bert Paper: “BERT: Pre-training of Deep Bidirectional Transformers for Language Understanding”
- Documentation of pytorch-pretrained-bert
